The Essential 8 Tips on Using Intraoral Camera

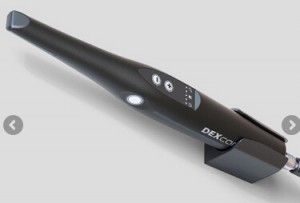
1.Be sure your hand fits comfortably on the wireless intraoral camera while using it. Hold it like a high-speed hand piece, and maneuver it as you would during an exam. If your hand fatigue exists after a short period, the hand piece may be too narrow, forcing you to squeeze rather than lightly grasping.

Dental Wireless Intraoral Camera 5.0 Mega Pixel COMS Image Automatically Focus

2.Make certain any focus adjustment provides an adequate depth of field at all settings. Do your video tour inside the mouth using both “macro” and “normal” settings. If you need to refocus repeatedly, then the depth of field is inadequate for your purposes.

3.Test handle-mounted freeze buttons to ensure easy operation and adequate capture speeds. This feature replaces foot controls to freeze an image, but pressing the button with your index finger causes movement at the tip of the instrument. Movement causes blurred images in units with inadequate capture speeds. Try this for yourself.

4.Check out the umbilical cord where the hand piece and cable attach. Pay special attention to the connection points because these areas are most susceptible to damage under regular use. Common symptoms include fraying of the umbilical or intermittent loss of image as the camera is moved.

5.Ensure that image artifacts (tiny colored spots surrounding shiny areas of the image) are kept to a minimum. These artifacts are illusive and can make images appear sharper than they really are. These colored spots can be annoying over time and may lead to mis-diagnosis.

6.Mount a protective sheath on your test-drive model. Make certain the image quality is maintained since this is standard infection control protocol.

7.Rate the image quality and ease of use in its intended environment…in-office and on your patients. Allow your staffs involvement in the decision making process. They will be using the product as much, if not, more than the dentist.

8.Understand the warranty, and look for a minimum of 1 year parts and labor. Ask about the servicing protocol and how the manufacturer will stand behind their product. Does the company offer a replacement or loaner program? If they don’t, question turnaround time on warranty service and parts availability.

The Things You Need to Know about Dental Intraoral Camera

An intraoral camera is a camera which is designed to be used in the mouth for the purpose of taking video or still photography. These cameras are most commonly used in dental offices, although patients can also use them at home to monitor dental health or to satisfy curiosity about what the inside of the mouth looks like. Several firms specialize in producing intraoral cameras and accessories, and others make adapters which can be used with conventional cameras so that they can be used in the mouth.

The intraoral camera is not just a diagnostic tool, but it also serves as an educational one too. In the past, dentists have struggled to explain dental decay and other health problems to patients. Most people cannot see well into their own mouths, which leaves dentists to drawing diagrams or using props to attempt to explain what is going on in the mouth of their patients.

With the intraoral camera, however, the patient sees exactly what the dentist sees on an in-office screen. If necessary, the dentist can pause on a particular tooth or area of the mouth to point out problems and explain possible treatment options. This also frees the patient to ask questions and become a part of the examination process. When dentists can point out specific places on the actual teeth that are decaying, patients may have a better idea of how home hygiene practices and brushing techniques are affecting them.

The intraoral camera makes record keeping a breeze. Because the camera can take pictures of decay or the beginnings of oral health conditions, images can be printed and placed into patient files. Previously, dentists merely attempted to write an explanation of problems found during exams. Now, dentists can accurately track the progress of treatments or problems for years following a visit. Furthermore, patients can receive printed pictures of the conditions the dentist finds, which may be beneficial for filing insurance claims.

The intra-oral camera makes going to the dentist easier for both the patient and the dental health provider. Offices that use intra-oral cameras allow patients to be more interactive in the exam process, which provides patients with a greater sense of understanding and responsibility about personal dental health. Although a traditional visual inspection of the teeth may have sufficed in the past, technology has made it possible for dentists and patients to reap many more benefits from each health exam.

What Can Intraoral Camera Do for You

The intraoral cameras designed for use in dental facilities come with disposable probes or probe covers to ensure that germs are not passed between patients, and they may come with a variety of options which enhance the functionality of the camera. Versions designed for home use are usually much more basic, but they can still be useful for people who want to see the inside of the mouth. Using a camera at home, someone can identify an issue which requires a dentist’s attention, keep an eye on a recovering surgical site, or teach children about the importance of oral hygiene.

One of the primary uses for an intraoral camera is in patient education. Dentists often find it helpful to be able to show patients exactly what is going on inside their mouths, and to highlight areas where medical attention may be needed. Patients are also less likely to defer or refuse procedures when they can clearly see the area at issue, as some people are suspicious of recommendations for dental procedures, due to concerns about cost, potential pain, or the fears about members of the dental profession.

In addition to being used in patient education, such cameras can also be used to take clear visual records for patient files, and to generate material which can be used in consultations and discussions with other dental providers. For example, a general dentist might use an intraoral camera to take images of a tooth or area of the jaw which requires oral surgery so that a maxillofacial surgeon can examine the information before he or she meets the patient to get an idea of the kind of surgery which might be required.

Images taken by an wireless intraoral camera can also be reviewed later, which can be useful for a dentist who feels a nagging suspicion that something is not quite right in the mouth of a patient. The intraoral camera can also be used to document procedures for legal and educational reasons, and to create projections of a patient’s mouth which can be used in medical schools for the purpose of educating future dentists about various issues which pertain to oral health.

The intra-oral camera makes record keeping a breeze. Because the camera can take pictures of decay or the beginnings of oral health conditions, images can be printed and placed into patient files. Previously, dentists merely attempted to write an explanation of problems found during exams. Now, dentists can accurately track the progress of treatments or problems for years following a visit. Furthermore, patients can receive printed pictures of the conditions the dentist finds, which may be beneficial for filing insurance claims.


DEXcam™ 4 Dental Intra-oral Camera

Using real-time intra-oral video and pictures when communicating with patients creates immediate visual impact and can aid in their under­standing of your clinical findings and treatment recommendations.

Historical images of an area captured over time can help tell a story of improvement or decline. This educational support makes an intra-oral video camera essential to your practice.

The DEXcam 4 dental intraoral camera¹ is an ideal addition to your imaging toolkit. It is exceptionally easy to use and delivers excellent quality, tooth decay pictures – all at an attractive price point.

dental intraoral camera usb

Thoughtfully Designed for Usability
The DEXcam 4 intra-oral video camera feels solid and balanced in your hand. The anodized aluminum housing has a high quality, professional aesthetic and adds a degree of durability.
Capture control is directly on the handpiece of this digital intraoral camera. The capture buttons are membrane switches that are highly sensitive and easy to trigger. This aids image clarity as camera movement is less likely.
Capture buttons on both sides make using it effortless for both right- and left-handers.
Freezing the image is done with a single press; saving the image into the patient record is done instantly with a simple press-and-hold.
At the camera end of the cable, a reliable, industrial-grade connector offers quick-disconnect/reconnect functionality. By placing a holder and cable in each operatory,² the camera can be moved conveniently from room to room without disturbing computer ports that may be hidden.

DEXcam™ 4 Intra-oral Camera

Ideal Images for Show-and-Tell
A long depth of field allows you to move closer to a tooth or away from it while the image remains in focus.
This dental imaging equipment has a camera with a tip that accommodates an extra wide aperture that is highly receptive to the illumination from its intensely bright, state-of-the art LEDs.
The intraoral digital camera has been optimized to help ensure images are displayed in natural color tones; and precision-ground glass optics help prevent any image distortion.
A Sony® CCD sensor delivers the highest resolution among the major standard-definition cameras.³ Its 520,000-pixel images are clear and sharp.
Contoured sheaths are custom-made to fit the DEXcam 4. This contributes to image integrity by eliminating the irregularities caused by wrinkled plastic that may occur when using generic barriers.

Related goods:dental pulp tester for sale

The Essential 8 Tips on Choosing Intraoral Cameras

Most best dental intraoral camera today are USB devices – a digital interface that allows direct connectivity to the computer.  What most do not know is that USB has a 15 foot cable length limitation and extending through hubs is never a good idea.  Care must be taken in positioning the computer to allow for this.  The intraoral camera should holster into position much like your high speed hand piece or syringes.  With such a high ROI, the intraoral camera requires easy access – without it, usage suffers.
The Essential 8 Tips
Be sure your hand fits comfortably on the camera while using it.  Hold it like a high-speed hand piece, and maneuver it as you would during an exam.  If your hand fatigue exists after a short period, the hand piece may be too narrow, forcing you to squeeze rather than lightly grasping.

Make certain any focus adjustment provides an adequate depth of field at all settings.  Do your video tour inside the mouth using both “macro” and “normal” settings.  If you need to refocus repeatedly, then the depth of field is inadequate for your purposes.

Test handle-mounted freeze buttons to ensure easy operation and adequate capture speeds. This feature replaces foot controls to freeze an image, but pressing the button with your index finger causes movement at the tip of the instrument.  Movement causes blurred images in units with inadequate capture speeds. Try this for yourself.

Check out the umbilical cord where the hand piece and cable attach. Pay special attention to the connection points because these areas are most susceptible to damage under regular use. Common symptoms include fraying of the umbilical or intermittent loss of image as the camera is moved.

Ensure that image artifacts (tiny colored spots surrounding shiny areas of the image) are kept to a minimum. These artifacts are illusive and can make images appear sharper than they really are. These colored spots can be annoying over time and may lead to mis-diagnosis.

Mount a protective sheath on your test-drive model. Make certain the image quality is maintained since this is standard infection control protocol.

Rate the image quality and ease of use in its intended environment…in-office and on your patients. Allow your staffs involvement in the decision making process. They will be using the product as much, if not, more than the dentist.

Understand the warranty, and look for a minimum of 1 year parts and labor. Ask about the servicing protocol and how the manufacturer will stand behind their product. Does the company offer a replacement or loaner program?  If they don’t, question turnaround time on warranty service and parts availability.

Related goods:dental lab equipment for sale